
There's a massive gap between how you think you play padel and how you actually play — and video closes that gap faster than almost any other tool available to amateur players. In 2026, filming a padel match is easier and cheaper than ever, yet the vast majority of players still do it with zero method and zero purpose.
Why video makes you improve faster than just playing more
The human brain has a powerful self-confirmation bias: we remember the spectacular overhead smash that ended the point and conveniently forget the five lobs we sent into the fence before it. When you film yourself, that filter disappears. You see exactly what happened, how many times, and in what situation.
Research in sports psychology using video feedback methodology consistently documents that athletes who watch themselves on video correct technical errors up to 40% faster than those who receive only verbal instruction. In padel, this is especially relevant because the game has an extremely fast point cadence — a 90-minute match can accumulate 150–200 game situations that no player can consciously retain in memory.
Padel also has a three-dimensional tactical layer that's nearly impossible to evaluate from inside the court: your position relative to your partner, whether you're covering the middle post, whether you're glued to the back glass or maintaining proper depth. Video reveals all of that in seconds.
"Video doesn't lie. Your memory does. When they disagree, trust the video."
The equipment you need (and what you don't)
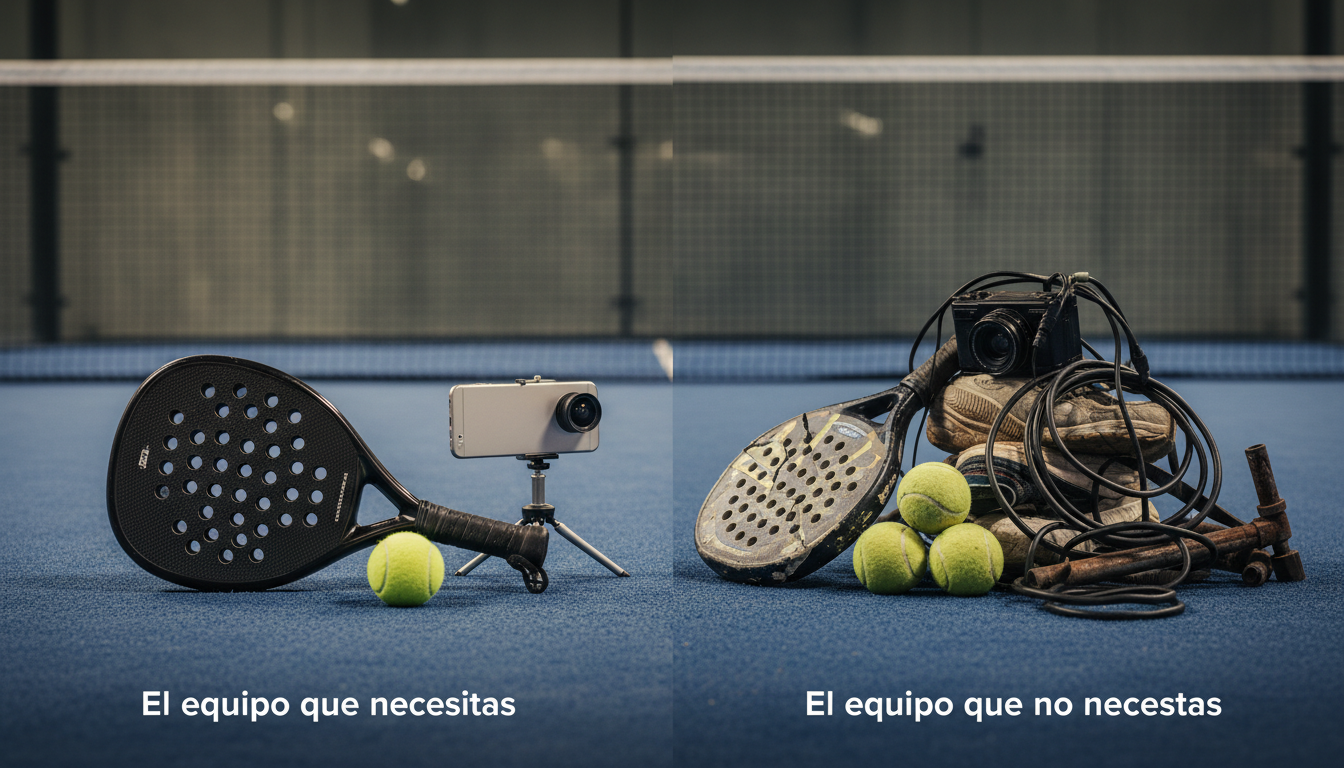
Before we talk angles and analysis, let's clear something up: you don't need professional gear to get real value from video. A modern smartphone shooting 1080p at 60fps is more than enough to detect 90% of the relevant technical and tactical errors in padel.
Recording options by budget
| Option | Equipment | Approx. cost | Best for |
|---|---|---|---|
| Basic | Smartphone + small desktop tripod | $8–17 USD ($150–300 MXN aprox) | General technical analysis |
| Mid-range | GoPro or action cam + suction mount for glass | $140–278 USD ($2,500–5,000 MXN aprox) | Back glass angle, POV shots |
| Advanced | Camera with optical zoom + tall tripod (6 ft) | $222–667 USD ($4,000–12,000 MXN aprox) | Fine technical detail, tournaments |
| Full tactical | Two cameras at complementary angles | Varies | Segunda, Primera, and Open players |
One padel-specific detail worth knowing: the metal cage framing on many courts will confuse your smartphone's autofocus, causing it to lock onto the tubes instead of the players. If that happens, switch to manual focus or tap the playing zone on your screen before hitting record.
The three angles that actually matter in padel
Angle is everything. A badly positioned camera can give you misleading or completely useless information. Padel's glass walls and 10 × 20 meter court give you some very specific options to work with.
Angle 1: Elevated side view (the most recommended)
Place the camera outside the court, roughly at net height or slightly above, centered along the sideline. From here you see the full court, all four players' positions, movement patterns, and ball depth. This is the angle most professional broadcast productions use for World Padel Tour and Premier Padel coverage, precisely because it's the most tactically readable.
The limitation: the net sometimes blocks the bounce in the service box area. If you have optical zoom, use it to compensate. Otherwise, accept that blind spot and supplement it with a different angle in specific technical sessions.
Angle 2: Behind the back glass
If your court has a glass back wall and allows you to mount a camera on the exterior top section, this angle is exceptional for individual technique analysis: the swing path on a bandeja, wrist action on a víbora, body rotation on a lob. Positioned 10–13 feet high and centered, you see everything happening in mid-court with remarkable detail.
A GoPro with a suction cup mount attached to the exterior glass (if the club allows it) delivers very good results. Always check with the facility first — some clubs have usage restrictions in their policies.
Angle 3: High diagonal or overhead
If the club has elevated bleachers or a walkway, placing the camera at a high diagonal gives you the best possible tactical view: you can see coverage diamonds, whether pairs are synchronized or creating gaps, and the ball circulation pattern throughout a rally. This angle becomes particularly valuable for players in Tercera (1000–1180 ELO) and above, when positional tactics start to be genuinely decisive.
What to film: full match vs. focused technical session
Not all recording sessions have the same goal. Before you hit record, define exactly what question you want that video to answer.
Recording a full match
Useful for tactical analysis and for detecting patterns that don't show up in short sessions. In a 60–90 minute padel match, you're looking to answer questions like:
- How many points are we losing to unforced errors versus opponents' winners?
- Where am I standing when they attack through the middle?
- How often am I using the side wall to construct the point versus going for direct winners?
- Are my partner and I crossing paths chasing the same ball, or leaving gaps in the center?
- What's actually happening in my service games — is my first or second serve a genuine weapon?
Recording a focused technical session
For working on a specific shot — say, your backhand bandeja — you don't need 90 minutes of footage. Ask your practice partner to feed you 30–40 balls in realistic match-like situations (semi-defensive, on the move) and film those 5–7 minutes from the back angle. You'll have more than enough material to analyze that shot in real detail.
This format works especially well when working with a coach. At PADEL VS, we encourage players to bring a 3–5 minute clip of their weakest shot to the first session with a new coach. It gives the instructor an objective visual diagnosis before they even step on court together.
How to analyze the video: a practical protocol
Filming without analyzing is just accumulating gigabytes. The analysis is where the real value lives. Here's a simple but effective protocol:
Step 1: Fast first pass (10–15 minutes)
Watch the full video at 1.5x or 2x speed. Don't stop, don't take detailed notes yet. The goal is to get a general impression and mark timestamps of moments you want to revisit. In your notes app, write things like "8:30 — long rally, why didn't I move up?" or "22:15 — víbora into the post."
Step 2: Technical analysis with pause (20–30 minutes)
Return to your marked timestamps and analyze each situation using pause and slow motion. For technique, use 0.25x or 0.5x slow motion in any standard video player. For each shot, look for:
- Preparation: When do I start preparing the shot? Am I getting there in time or improvising?
- Body position: Am I turned sideways or facing the ball straight on? In padel, facing the ball directly is a technical error on most offensive shots.
- Contact point: Am I contacting the ball in front of my body, too far back, or too far forward?
- Follow-through: Does my swing finish completely or does it cut off early?
- Recovery: Do I immediately return to position, or do I stand watching my own shot?
Step 3: Tactical analysis with simple stats
Pick one set or 15 minutes of play and count manually. You don't need specialized software — a piece of paper is enough. Count:
- Points won by winners vs. points lost by unforced errors (a healthy ratio in Tercera and Segunda is 1:1.5 or better)
- How many times you and your partner move up to the net vs. staying back
- First serve percentage in (players from Quinta to Tercera typically land between 55–70%; pushing that to 75%+ measurably changes match dynamics)
Step 4: One single actionable conclusion
This is the most commonly skipped step. After analyzing, write down one single thing you're going to work on in your next 3–5 training sessions. Not five things. One. Improvement in padel is sequential, not parallel. If you try to fix everything simultaneously, you fix nothing.
"The player who films once a month and draws one concrete conclusion improves more than the one who trains three times a week with zero objective feedback."
Video analysis tools for padel
You don't need elite software to get started, but there are tools that accelerate the process significantly:
- Coach's Eye / Hudl Technique: Mobile apps built specifically for sports analysis. They allow slow motion, side-by-side comparison, and line annotations directly on the video. They cost roughly $8–19 USD per month and are widely used by padel coaches in Spain, Argentina, and increasingly in Mexico.
- Dartfish Express: Free version with basic slow motion and stop-motion functions — more than enough for most amateur players.
- iMovie / CapCut: Great for quick cuts, before/after comparisons, or creating clips to share with your coach over WhatsApp or Telegram.
- Google Drive or iCloud: For archiving and accessing footage from any device. Organize by date and category: "2026-03 / Bandeja / Pre-season."
Practical tips for filming on real courts
Discussing cameras and angles is easy in theory. In practice, padel courts have specific physical constraints you need to know about:
- Artificial lighting: Most indoor courts in Mexico use high-intensity LEDs that create hard shadows and can produce a flicker effect on video. If your camera allows manual shutter speed adjustment, set it to 1/120 or 1/100 to sync with the 60Hz electrical frequency used in Mexico.
- Reflective glass panels: Back and side glass panels will reflect the camera if you position it too close. Keep at least 3–6 feet of distance or use an oblique angle to avoid direct reflection.
- Tripod vs. freestanding: A basic 5–6 foot tripod costs roughly $17–33 USD ($300–600 MXN aprox) and is the most valuable investment after the smartphone itself. Leaning your phone against a bag or pressing it against the glass won't give you the stable angle you need for meaningful analysis.
- Tell your opponents: Out of courtesy and in line with many clubs' house rules, always let other players know you're filming. Nobody should appear on video without being aware of it.
How to integrate video into your improvement routine
Sporadic filming has limited value. What actually works is making it a lightweight but consistent habit. A realistic cadence for an amateur player who plays 2–3 times per week:
- Every 2–3 weeks: Film a full match for general tactical analysis.
- Once a month: Focused technical session on whichever shot you're developing that training cycle.
- Every 2–3 months: Compare current footage side-by-side with older clips to measure actual progress over time.
At PADEL VS, our ELO system tells you how much you're improving in results — but video tells you why you're improving or why you're plateauing. They're complementary tools: ELO measures outcomes, video measures process. A player in Cuarta (850–1000 ELO) aiming to break into Tercera (1000–1180 ELO) needs to know exactly which two or three technical or tactical patterns are holding them back — and video is the most honest instrument available to identify them.
You can track your ELO progression over time by opening padelvs.com in your browser or through the Telegram Mini App via @padelvsbot. Pair that data with your video analysis and you'll have a complete feedback loop: objective match results plus process insight from your own footage.
The most common mistake when filming yourself
The number one mistake isn't technical and it has nothing to do with your equipment: it's filming without a prior question. Players turn on the camera, record 90 minutes, watch 10 minutes of footage with a vague sense of confusion, and archive it forever. Without a specific question to answer, video is just noise.
Before every filmed session, write a specific question in your phone. Real examples:
- "Am I arriving late to fast balls on my backhand side?"
- "How many points are we losing because I stay back when my partner moves up?"
- "Does my serve have enough variation or am I always targeting the same spot?"
With that question in mind, analysis is fast, concrete, and actionable. Without it, it's a waste of time.
Start this week: a basic tripod, your smartphone, and the right question. That's genuinely all you need to make video start working for you on the court.


